Showing posts with label FREE PATTERN. Show all posts

Thursday, December 31, 2009

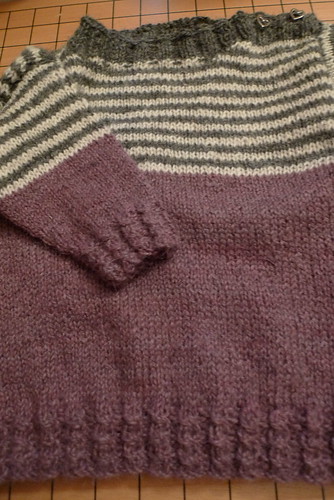
Johan's Pullover


Johan is my new nephew, 2 weeks old. This pullover will keep him warm for a few months, the size is for 0-6 months.


Yarn: Something that gives 10 cm = 21/22x34 stitches. I used Sajama Alpaca and needle 3 mm.
If you don't like to knit swatches, start with an arm, it is far less to frog if it turns out wrong.

You need:
Yarn in 3 colours, I used around 70 g plum, 25 g nature white and 40 g nature black. Needles size 3, dpn's for arms and a circular for the yoke 2 cute buttons for the shoulder, a needle to weave in ends, attach the arms to the yoke, and to sew on the buttons.

CO: 120 sts and knit around.

The cable rib is knitted like this:
1: P2, K2 repeat
2: P2, K2, repeat
3: P2, slip one st on a needle behind the work, K1, K the slipped st. repeat (an easier way to knit this cable is to leave both sts on the needle, but knit st number 2 first without slipping the first st off, and then knit st number one, and slip both sts off together)
4: P2, K2 repeat
Knit until rib is 3,5 cm

Yoke: Continue knitting around with plum (or your own main colour) until work is total of 18 cm
Now part front and back and knit across 60 sts, and purl back 60 sts in black and white stripes.
Each stripe is K1 row, P1 row.

Front: After 10 cm you round the neck like this (while continuing the stripes):
Left shoulder (the right side facing you)
Knit 20, turn, P2tog, purl all sts, turn
Knit all, turn P2tog, purl all, turn
Knit all, turn, P2tog, purl all, leave sts on a needle or stitch holder.

Count 20 sts for the neck, leve these also on a needle

Right shoulder (or left facing you)
K2tog, K all, turn, Purl all, turn
K2tog, K all, turn, Purl all

Back:
Knit stripes until you have the same amount of stripes as the front. It should measure 30 cm total.
Leave all sts on the needle. Put away and knit arms.

Arms: CO 32 sts on dpn's and knit cable rib around for 3,5 cm as described.
After rib, increase 2 st each 4th round under the arm. I increase on each side of 2 sts.
Knit Plum (main colour) for a total of 9 cm with the rib and change for stripes. Knit stripes (remember to increase) until the whole arm is 17 cm and cast off loosely. The arm might look very short, but babies are strangely proportioned.
In case you forgot; make one more arm, just like this one.

Collar and finishing:
Now start to attach the different parts together: I left the stitches on the shoulders to avoid seams there, so use grafting (sewn or knitted) to put together the right side shoulder (left facing you).

Now knit all stitches from the front side of the left shoulder with black yarn, pick up 6 sts where you rounded the front neck, knit all the 20 front stitches, pick up 6 sts on the other side of the rounded neck, and knit all the back stitches. Now knit and turn across all these stitches K2, P2 4 rows
Make buttonholes the next row like this: Work K2,P2 according to your work 4 sts, cast off 2 sts, K&P 4 sts cast off 2 sts, continue working K2/P2 across work. Turn. Work knit 2 and purl 2 as usual until you get to the button holes. Work 2 sts in the end st and connect the hole to the work again. K/P 4 and repeat with the other button hole. K/P last 4 sts. Turn and work 3 more rows ending with the front facing you. Cast off loosely.

Block all parts before joining them. If the yarn tolerates it, use a steam iron.
Sew the left shoulder collar short ends (where the arm starts) together, laying flat on top of each other. Sew on the buttons.
Join the arms and sew on. I like to start on the top of the arm working my way down, in case I have to hide a few rows of sin (if it doesn't fit properly), better to hide it under the arm than on visible places.

Weave in ends, and you have a baby pullover!
Saturday, July 19, 2008

Vintage Washcloth


VINTAGE VASKEKLUT
Du trenger ubetydelige mengder bomullsrestegarn, jeg har brukt Petunia i to farger. Denne blir fin både ensfarget, i to eller tre eller seks farger, og i selvstripende garn. Pass på strikkefastheten så den ikke blir slaskete.

Legg opp 20 masker, la det være en 20 cm lang trådende igjen til å sy den sammen med etterpå.

Hvis du vil unngå hull når du snur inni arbeidet, gjør du sånn:


Før du snur legg tråden på forsiden av arbeidet, ta av neste maske på venstre pinne, legg tråden rundt masken, legg masken tilbake på venstre pinne, snu.
Når du strikker masken senere, strikk masken sammen med denne tråden som den er pakket inn i.


Omganger:
1: Strikk alle maskene
2: Legg opp 1, fell av en (Picot), strikk 18 m, snu (1 m igjen på venstre pinne)
3: (Og alle alternerende omganger) ta av en m, strikk alle
4: Ta av en m, strikk 17 m, snu - (2 m igjen på venstre pinne)
5: Som omg 3
6: Picot, strikk 16 m, snu - (3 m igjen på venstre pinne)
7: Som omg 3
8: Ta av en m, strikk 15, snu - (4 m igjen på venstre pinne)
9: Som omg 3
10: Picot, strikk 14 m, snu - (5 m igjen på venstre pinne)
11: Som omg 3
12: Ta av en m, strikk 13 m, snu - (6 m igjen på venstre pinne)
13: Som omg 3
14: Picot, strikk 12 m, snu - (7 m igjen på venstre pinne)
15: Som omg 3
16: Ta av en m, strikk 11 m, snu, (8 m igjen på venstre pinne)
17: Som omg 3
18: Picot, strikk 10 m, snu - (9 m igjen på venstre pinne)
19: Som omg 3
20: Ta av en m, strikk 9 m, snu - (10 m igjen på venstre pinne)
21: Som omg 3
22: Picot, strikk 8 m, snu - (11 m igjen på venstre pinne)
23: Som omg 3
24: Ta av en m, strikk 7 m, snu - (12 m igjen på venstre pinne)
25: Som omg 3
26: Picot, strikk 6 m, snu - (13 m igjen på venstre pinne)
27: Som omg 3
28: Ta av en m, strikk 5 m, snu - (14 m igjen på venstre pinne)
29: Som omg 3
30: Picot, strikk 4 m, snu - (15 m igjen på venstre pinne)
31: Som omg 3
32: Ta av en, strikk alle (husk å strikke med både innpakningstråd og maske om du bruker min snuoperasjonsmetode)

Gjenta disse 32 omgangene 5 ganger til = 6 virvler.
Sy sammen to ender, og vips! - en vaskeklut. Med tykkere garn får du en gryteklut.

Wednesday, December 19, 2007

kaos' zigs and zags socks -free pattern


During the 60s my brother, me and two cousins all had pullovers knitted in this pattern. Our pullovers were “technicoloured” – pastel yellow, pastel green, turquoise and pink. Attacked by some sentimental memories I decided to find out how to knit the pattern, – and make socks. The zigzag pattern makes the socks very elastic as well as nice and warm. And the pattern is very easy as it is knit and purl only.

You need 5 or 6 double pointed needles of 3 or 3,5 mm and 100 g sock yarn – gauge 24sts=10cm. Size S-M

1: CO 52 sts. 13 sts on each needle.
2: Cuff: K1tbl, P1 until cuff is 5 cm.
3: Change to pattern:
– Row 1: K1, *P2, K2, P2* (repeat until 1 sts left), K1
– Row 2: *P2, K2* (repeat all sts)
These 2 rows form pattern.
4: Knit pattern until sock measures 14 cm (including cuff).
5: Knit heel on needle 2 and 3 with stocking stitch over 26 sts. Work heel on three needles (9+8+9 sts).
6: Knit short row heel.
W&T:
wrap and turn. On RS rows, bring yarn forward, sl1, move yarn back, slip st back to left needle, turn. On WS rows, take yarn back, Sl1, bring yarn forward, slip st back to left needle, turn.

Row 1 (WS): P to last st, wrap and turn
Row 2: K to last st, W&T
Row 3: P to last st before wrapped st, W&T
Row 4: K to last st before wrapped st, W&T

Repeat rows 3 and 4 until there are 8 unwrapped sts on the (middle) needle.

Row 1 (RS): Knit to first wrapped st, pick up the wrap from front to back, and K together with the next st, W&T (yes you wrap the stitch twice).
Row 2: P to first wrapped st, pick up the wrap from back to front, and P together with the next st, W&T
Row 3: K to first double-wrapped st, pick up both wraps, and K together with next st.
Row 4: P to first double-wrapped st, pick up both wraps, and P together with next st.

Repeat rows 3 and 4 until all sts have been worked. The st on each end of the needle will still have wraps. Pick these up, and work together with the next st as you come to them.

7: Begin working circularly again. Continue pattern on needle 1 and 4 and stocking stitch on needle 2 and 3 until wanted size.

8: Knit toe:

Needle 1: Knit until 3 sts remain on needle, K2tbl, K1.

Needle 2: K1, K2tog, K remaining sts.

Needle 3: As needle 1

Needle 4: As needle 2

Cont until 2 sts remain on each needle. Cut the yarn, leaving a 15 cm tail. Thread a blunt needle with the yarn, and run it around through all 8 remaining stitches twice. Pull tight, tie off, and weave in the ends.

If you want a pdf of the pattern instead, please send me a mail.